Hello everyone, hope you are all well.
Today I am presenting a new fancy way to support screen sizes in android.
It’s easy and will make your development faster.
Requirements:
- Photoshop
- Android studio or any other android IDE software
A developer usually receives the application design from a graphic designer and then starts building the application layouts.
1- Open the image on photoshop
As an example, the below image is just a simple design for 4 buttons. Let’s assume we got this from our designer. He’s not very good 😛
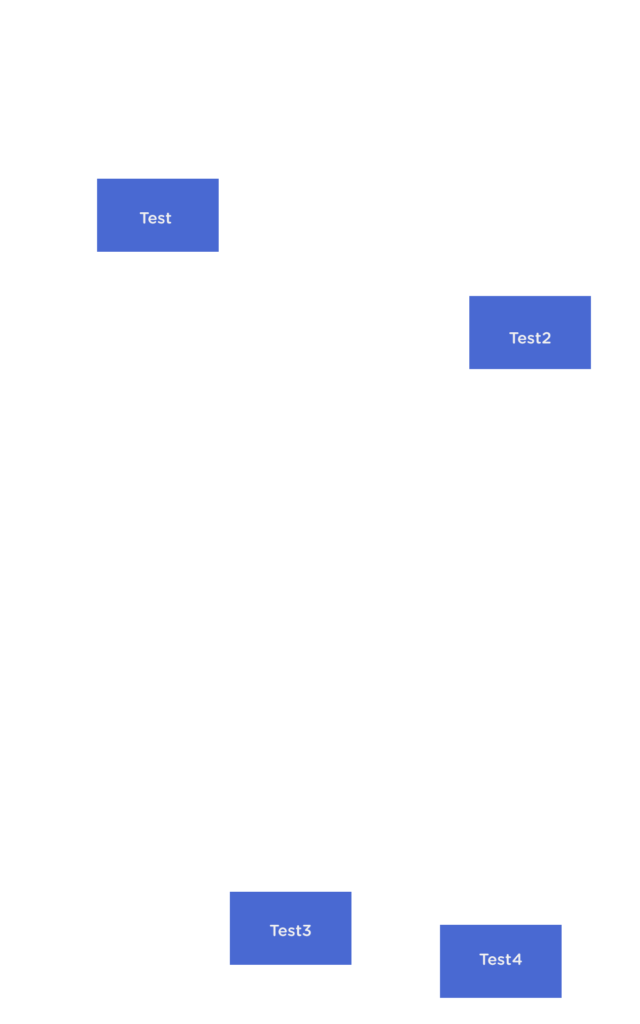
Image on Photoshop without viewing the grid lines
2- Add grid lines to the image
Photoshop allows you to add grid lines to an image. You can choose the grid’s color, width, percentage etc…
As an example, this image has grid lines where the space between the lines is 5% of the screen size. Therefore, button “test” is 3.1 GRID units/cells from the left and 3.5 GRID units/cells from the top. The distance and sizes of all the buttons are extracted in the same way.
Image on Photoshop with grid lines
3- Use relative layout in android and add all your views within it
<RelativeLayout xmlns:android="http://schemas.android.com/apk/res/android"
    xmlns:tools="http://schemas.android.com/tools"
    android:layout_width="match_parent"
    android:layout_height="match_parent"
    tools:context=".MainActivity">

    <Button
        android:id="@+id/button1"
        android:layout_width="wrap_content"
        android:layout_height="wrap_content"
        android:background="#4969d2"
        android:text="Test"
        android:textColor="#ffffff" />

    <Button
        android:id="@+id/button2"
        android:layout_width="wrap_content"
        android:layout_height="wrap_content"
        android:background="#4969d2"
        android:text="Test2"
        android:textColor="#ffffff" />


    <Button
        android:id="@+id/button3"
        android:layout_width="wrap_content"
        android:layout_height="wrap_content"
        android:background="#4969d2"
        android:text="Test3"
        android:textColor="#ffffff" />

    <Button
        android:id="@+id/button4"
        android:layout_width="wrap_content"
        android:layout_height="wrap_content"
        android:background="#4969d2"
        android:text="Test4"
        android:textColor="#ffffff" />

</RelativeLayout>
4- Methods which will be Used
The following predefined methods should be used to implement the above:
setWithTitleBar: determines if the view is with or without a status bar
onLayoutCreate: we will override this method to manage the views positions
setTextSize: changes the text size of the buttons, textview, and editText
setViewWidthHeight: changes the views width and height
setMargin: sets the margins for a view
topRight: sets the position of the view (x GRID units/cells from top and right)
rightBottom: sets the position of the view (x GRID units/cells from right and bottom)
leftTop: sets the position of the view (x GRID units/cells from left and top)
leftBottom: sets the position of the view (x GRID units/cells from left and bottom)
In order to access and use the methods above, your class or activity should extend the Screen class from the library.
However, we will override the method “onLayoutCreate” and add our own code. The code is represented below:
import com.comred.grid_android_designer.Screen;

public class MainActivity extends Screen {

    @Override
    protected void onCreate(Bundle savedInstanceState) {
        super.onCreate(savedInstanceState);
        requestWindowFeature(Window.FEATURE_NO_TITLE);
        getWindow().setFlags(WindowManager.LayoutParams.FLAG_FULLSCREEN,
                WindowManager.LayoutParams.FLAG_FULLSCREEN);
        setWithTitleBar(false);
        setContentView(R.layout.activity_main);
    }

    @Override
    public void onLayoutCreate() {
        super.onLayoutCreate();

        setViewWidthHeight(R.id.button1, 3.9f, 1.4f);
        setViewWidthHeight(R.id.button2, 3.9f, 1.4f);
        setViewWidthHeight(R.id.button3, 3.9f, 1.4f);
        setViewWidthHeight(R.id.button4, 3.9f, 1.4f);

        setTextSize(R.id.button1, SP * 0.6f);
        setTextSize(R.id.button2, SP * 0.6f);
        setTextSize(R.id.button3, SP * 0.6f);
        setTextSize(R.id.button4, SP * 0.6f);

        leftTop(R.id.button1, 3.0f, 3.5f);
        topRight(R.id.button2, 5.75f, 1.6f);
        leftBottom(R.id.button3, 7.1f, 1.2f);
        rightBottom(R.id.button4, 2.5f, 0.5f);
    }

}