PayTM is the largest mobile commerce platform and digital wallet company. It has large user base of around 300 million and average transactions of 5 million per day. All digital payments can be made through paytm like mobile recharges, electricity bills, credit cards etc. Almost everything under the earth is covered in paytm 🙂 Paytm is fast, reliable and more accessible payment solution.
PayTM also provides payment gateway solution that can be integrated into web and mobile apps with UPI, Debit/ Credit Card, NetBanking and PayTM Wallet payment options.
Today, in this article we are going to see how to integrate the PayTM gateway in a simple (bit complex actually 😛 ) e-commerce app. As writing an e-commerce app needs a bit of coding and architecture, everything can’t be covered in a single article. So, I have prepared a sample project (both web and mobile) and provided the code on Github. I also tried making it simple as much as possible so that every beginner can understand it.
The example app I have created is very minimal with very limited screens. It has database (Realm), network layer (Retrofit) and payment options.
Here are the screenshots from the app.
.wds_slider_0 video::-webkit-media-controls-panel { display: none!important; -webkit-appearance: none; } .wds_slider_0 video::–webkit-media-controls-play-button { display: none!important; -webkit-appearance: none; } .wds_slider_0 video::-webkit-media-controls-start-playback-button { display: none!important; -webkit-appearance: none; } .wds_bigplay_0, .wds_slideshow_image_0, .wds_slideshow_video_0 { display: block; } .wds_bulframe_0 { display: none; background-image: url(”); margin: 0px; position: absolute; z-index: 3; -webkit-transition: left 1s, right 1s; transition: left 1s, right 1s; width: 30%; height: 30%; } #wds_container1_0 #wds_container2_0 { margin: 0px ; text-align: center; visibility: hidden; } #wds_container1_0 #wds_container2_0 .wds_slideshow_image_wrap_0, #wds_container1_0 #wds_container2_0 .wds_slideshow_image_wrap_0 * { box-sizing: border-box; -moz-box-sizing: border-box; -webkit-box-sizing: border-box; } #wds_container1_0 #wds_container2_0 .wds_slideshow_image_wrap_0 { background-color: rgba(0, 0, 0, 0.00); border-width: 0px; border-style: none; border-color: #000000; border-radius: ; border-collapse: collapse; display: inline-block; position: relative; text-align: center; width: 100%; box-shadow: ; overflow: hidden; z-index: 0; } #wds_container1_0 #wds_container2_0 .wds_slideshow_image_0 { width: 100%; height: 100%; float: none !important; padding: 0 !important; margin: 0 !important; vertical-align: middle; } #wds_container1_0 #wds_container2_0 .wds_slideshow_image_0 video { padding: 0 !important; margin: 0 !important; vertical-align: middle; background-position: center center; background-repeat: no-repeat; } #wds_container1_0 #wds_container2_0 .wds_slideshow_image_container_0 { display: /*table*/block; position: absolute; text-align: center; vertical-align: middle; width: 100%; height: 100%; } @media only screen and (min-width: 0px) and (max-width: 320px) { .wds_bigplay_0, .wds_bigplay_layer { position: absolute; width: 20px; height: 20px; background-image: url(‘https://www.androidhive.info/wp-content/plugins/slider-wd/images/button/button3/2/1.png’); background-position: center center; background-repeat: no-repeat; background-size: cover; transition: background-image 0.2s ease-out; -ms-transition: background-image 0.2s ease-out; -moz-transition: background-image 0.2s ease-out; -webkit-transition: background-image 0.2s ease-out; top: 0; left: 0; right: 0; bottom: 0; margin: auto } .wds_bigplay_0:hover, .wds_bigplay_layer:hover { background: url(‘https://www.androidhive.info/wp-content/plugins/slider-wd/images/button/button3/2/2.png’) no-repeat; width: 20px; height: 20px; background-position: center center; background-repeat: no-repeat; background-size: cover; } #wds_container1_0 #wds_container2_0 .wds_slideshow_dots_thumbnails_0 { height: 16px; width: 96px; } #wds_container1_0 #wds_container2_0 .wds_slideshow_dots_0 { font-size: 12px; margin: 2px; width: 12px; height: 12px; } #wds_container1_0 #wds_container2_0 .wds_pp_btn_cont { font-size: 20px; height: 20px; width: 20px; } #wds_container1_0 #wds_container2_0 .wds_left_btn_cont, #wds_container1_0 #wds_container2_0 .wds_right_btn_cont { height: 20px; font-size: 20px; width: 20px; } } @media only screen and (min-width: 321px) and (max-width: 480px) { .wds_bigplay_0, .wds_bigplay_layer { position: absolute; width: 30px; height: 30px; background-image: url(‘https://www.androidhive.info/wp-content/plugins/slider-wd/images/button/button3/2/1.png’); background-position: center center; background-repeat: no-repeat; background-size: cover; transition: background-image 0.2s ease-out; -ms-transition: background-image 0.2s ease-out; -moz-transition: background-image 0.2s ease-out; -webkit-transition: background-image 0.2s ease-out; top: 0; left: 0; right: 0; bottom: 0; margin: auto } .wds_bigplay_0:hover, .wds_bigplay_layer:hover { background: url(‘https://www.androidhive.info/wp-content/plugins/slider-wd/images/button/button3/2/2.png’) no-repeat; width: 30px; height: 30px; background-position: center center; background-repeat: no-repeat; background-size: cover; } #wds_container1_0 #wds_container2_0 .wds_slideshow_dots_thumbnails_0 { height: 22px; width: 132px; } #wds_container1_0 #wds_container2_0 .wds_slideshow_dots_0 { font-size: 18px; margin: 2px; width: 18px; height: 18px; } #wds_container1_0 #wds_container2_0 .wds_pp_btn_cont { font-size: 30px; height: 30px; width: 30px; } #wds_container1_0 #wds_container2_0 .wds_left_btn_cont, #wds_container1_0 #wds_container2_0 .wds_right_btn_cont { height: 30px; font-size: 30px; width: 30px; } } @media only screen and (min-width: 481px) and (max-width: 640px) { .wds_bigplay_0, .wds_bigplay_layer { position: absolute; width: 40px; height: 40px; background-image: url(‘https://www.androidhive.info/wp-content/plugins/slider-wd/images/button/button3/2/1.png’); background-position: center center; background-repeat: no-repeat; background-size: cover; transition: background-image 0.2s ease-out; -ms-transition: background-image 0.2s ease-out; -moz-transition: background-image 0.2s ease-out; -webkit-transition: background-image 0.2s ease-out; top: 0; left: 0; right: 0; bottom: 0; margin: auto } .wds_bigplay_0:hover, .wds_bigplay_layer:hover { background: url(‘https://www.androidhive.info/wp-content/plugins/slider-wd/images/button/button3/2/2.png’) no-repeat; width: 40px; height: 40px; background-position: center center; background-repeat: no-repeat; background-size: cover; } #wds_container1_0 #wds_container2_0 .wds_slideshow_dots_thumbnails_0 { height: 26px; width: 156px; } #wds_container1_0 #wds_container2_0 .wds_slideshow_dots_0 { font-size: 20px; margin: 3px; width: 20px; height: 20px; } #wds_container1_0 #wds_container2_0 .wds_pp_btn_cont { font-size: 40px; height: 40px; width: 40px; } #wds_container1_0 #wds_container2_0 .wds_left_btn_cont, #wds_container1_0 #wds_container2_0 .wds_right_btn_cont { height: 40px; font-size: 40px; width: 40px; } } @media only screen and (min-width: 641px) and (max-width: 768px) { .wds_bigplay_0, .wds_bigplay_layer { position: absolute; width: 40px; height: 40px; background-image: url(‘https://www.androidhive.info/wp-content/plugins/slider-wd/images/button/button3/2/1.png’); background-position: center center; background-repeat: no-repeat; background-size: cover; transition: background-image 0.2s ease-out; -ms-transition: background-image 0.2s ease-out; -moz-transition: background-image 0.2s ease-out; -webkit-transition: background-image 0.2s ease-out; top: 0; left: 0; right: 0; bottom: 0; margin: auto } .wds_bigplay_0:hover, .wds_bigplay_layer:hover { background: url(‘https://www.androidhive.info/wp-content/plugins/slider-wd/images/button/button3/2/2.png’) no-repeat; width: 40px; height: 40px; background-position: center center; background-repeat: no-repeat; background-size: cover; } #wds_container1_0 #wds_container2_0 .wds_slideshow_dots_thumbnails_0 { height: 26px; width: 156px; } #wds_container1_0 #wds_container2_0 .wds_slideshow_dots_0 { font-size: 20px; margin: 3px; width: 20px; height: 20px; } #wds_container1_0 #wds_container2_0 .wds_pp_btn_cont { font-size: 40px; height: 40px; width: 40px; } #wds_container1_0 #wds_container2_0 .wds_left_btn_cont, #wds_container1_0 #wds_container2_0 .wds_right_btn_cont { height: 40px; font-size: 40px; width: 40px; } } @media only screen and (min-width: 769px) and (max-width: 800px) { .wds_bigplay_0, .wds_bigplay_layer { position: absolute; width: 40px; height: 40px; background-image:
url(‘https://www.androidhive.info/wp-content/plugins/slider-wd/images/button/button3/2/1.png’); background-position: center center; background-repeat: no-repeat; background-size: cover; transition: background-image 0.2s ease-out; -ms-transition: background-image 0.2s ease-out; -moz-transition: background-image 0.2s ease-out; -webkit-transition: background-image 0.2s ease-out; top: 0; left: 0; right: 0; bottom: 0; margin: auto } .wds_bigplay_0:hover, .wds_bigplay_layer:hover { background: url(‘https://www.androidhive.info/wp-content/plugins/slider-wd/images/button/button3/2/2.png’) no-repeat; width: 40px; height: 40px; background-position: center center; background-repeat: no-repeat; background-size: cover; } #wds_container1_0 #wds_container2_0 .wds_slideshow_dots_thumbnails_0 { height: 26px; width: 156px; } #wds_container1_0 #wds_container2_0 .wds_slideshow_dots_0 { font-size: 20px; margin: 3px; width: 20px; height: 20px; } #wds_container1_0 #wds_container2_0 .wds_pp_btn_cont { font-size: 40px; height: 40px; width: 40px; } #wds_container1_0 #wds_container2_0 .wds_left_btn_cont, #wds_container1_0 #wds_container2_0 .wds_right_btn_cont { height: 40px; font-size: 40px; width: 40px; } } @media only screen and (min-width: 801px) and (max-width: 1024px) { .wds_bigplay_0, .wds_bigplay_layer { position: absolute; width: 40px; height: 40px; background-image: url(‘https://www.androidhive.info/wp-content/plugins/slider-wd/images/button/button3/2/1.png’); background-position: center center; background-repeat: no-repeat; background-size: cover; transition: background-image 0.2s ease-out; -ms-transition: background-image 0.2s ease-out; -moz-transition: background-image 0.2s ease-out; -webkit-transition: background-image 0.2s ease-out; top: 0; left: 0; right: 0; bottom: 0; margin: auto } .wds_bigplay_0:hover, .wds_bigplay_layer:hover { background: url(‘https://www.androidhive.info/wp-content/plugins/slider-wd/images/button/button3/2/2.png’) no-repeat; width: 40px; height: 40px; background-position: center center; background-repeat: no-repeat; background-size: cover; } #wds_container1_0 #wds_container2_0 .wds_slideshow_dots_thumbnails_0 { height: 26px; width: 156px; } #wds_container1_0 #wds_container2_0 .wds_slideshow_dots_0 { font-size: 20px; margin: 3px; width: 20px; height: 20px; } #wds_container1_0 #wds_container2_0 .wds_pp_btn_cont { font-size: 40px; height: 40px; width: 40px; } #wds_container1_0 #wds_container2_0 .wds_left_btn_cont, #wds_container1_0 #wds_container2_0 .wds_right_btn_cont { height: 40px; font-size: 40px; width: 40px; } } @media only screen and (min-width: 1025px) and (max-width: 1366px) { .wds_bigplay_0, .wds_bigplay_layer { position: absolute; width: 40px; height: 40px; background-image: url(‘https://www.androidhive.info/wp-content/plugins/slider-wd/images/button/button3/2/1.png’); background-position: center center; background-repeat: no-repeat; background-size: cover; transition: background-image 0.2s ease-out; -ms-transition: background-image 0.2s ease-out; -moz-transition: background-image 0.2s ease-out; -webkit-transition: background-image 0.2s ease-out; top: 0; left: 0; right: 0; bottom: 0; margin: auto } .wds_bigplay_0:hover, .wds_bigplay_layer:hover { background: url(‘https://www.androidhive.info/wp-content/plugins/slider-wd/images/button/button3/2/2.png’) no-repeat; width: 40px; height: 40px; background-position: center center; background-repeat: no-repeat; background-size: cover; } #wds_container1_0 #wds_container2_0 .wds_slideshow_dots_thumbnails_0 { height: 26px; width: 156px; } #wds_container1_0 #wds_container2_0 .wds_slideshow_dots_0 { font-size: 20px; margin: 3px; width: 20px; height: 20px; } #wds_container1_0 #wds_container2_0 .wds_pp_btn_cont { font-size: 40px; height: 40px; width: 40px; } #wds_container1_0 #wds_container2_0 .wds_left_btn_cont, #wds_container1_0 #wds_container2_0 .wds_right_btn_cont { height: 40px; font-size: 40px; width: 40px; } } @media only screen and (min-width: 1367px) and (max-width: 1824px) { .wds_bigplay_0, .wds_bigplay_layer { position: absolute; width: 40px; height: 40px; background-image: url(‘https://www.androidhive.info/wp-content/plugins/slider-wd/images/button/button3/2/1.png’); background-position: center center; background-repeat: no-repeat; background-size: cover; transition: background-image 0.2s ease-out; -ms-transition: background-image 0.2s ease-out; -moz-transition: background-image 0.2s ease-out; -webkit-transition: background-image 0.2s ease-out; top: 0; left: 0; right: 0; bottom: 0; margin: auto } .wds_bigplay_0:hover, .wds_bigplay_layer:hover { background: url(‘https://www.androidhive.info/wp-content/plugins/slider-wd/images/button/button3/2/2.png’) no-repeat; width: 40px; height: 40px; background-position: center center; background-repeat: no-repeat; background-size: cover; } #wds_container1_0 #wds_container2_0 .wds_slideshow_dots_thumbnails_0 { height: 26px; width: 156px; } #wds_container1_0 #wds_container2_0 .wds_slideshow_dots_0 { font-size: 20px; margin: 3px; width: 20px; height: 20px; } #wds_container1_0 #wds_container2_0 .wds_pp_btn_cont { font-size: 40px; height: 40px; width: 40px; } #wds_container1_0 #wds_container2_0 .wds_left_btn_cont, #wds_container1_0 #wds_container2_0 .wds_right_btn_cont { height: 40px; font-size: 40px; width: 40px; } } @media only screen and (min-width: 1825px) and (max-width: 3000px) { .wds_bigplay_0, .wds_bigplay_layer { position: absolute; width: 40px; height: 40px; background-image: url(‘https://www.androidhive.info/wp-content/plugins/slider-wd/images/button/button3/2/1.png’); background-position: center center; background-repeat: no-repeat; background-size: cover; transition: background-image 0.2s ease-out; -ms-transition: background-image 0.2s ease-out; -moz-transition: background-image 0.2s ease-out; -webkit-transition: background-image 0.2s ease-out; top: 0; left: 0; right: 0; bottom: 0; margin: auto } .wds_bigplay_0:hover, .wds_bigplay_layer:hover { background: url(‘https://www.androidhive.info/wp-content/plugins/slider-wd/images/button/button3/2/2.png’) no-repeat; width: 40px; height: 40px; background-position: center center; background-repeat: no-repeat; background-size: cover; } #wds_container1_0 #wds_container2_0 .wds_slideshow_dots_thumbnails_0 { height: 26px; width: 156px; } #wds_container1_0 #wds_container2_0 .wds_slideshow_dots_0 { font-size: 20px; margin: 3px; width: 20px; height: 20px; } #wds_container1_0 #wds_container2_0 .wds_pp_btn_cont { font-size: 40px; height: 40px; width: 40px; } #wds_container1_0 #wds_container2_0 .wds_left_btn_cont, #wds_container1_0 #wds_container2_0 .wds_right_btn_cont { height: 40px; font-size: 40px; width: 40px; } } #wds_container1_0 #wds_container2_0 .wds_slideshow_video_0 { padding: 0 !important; margin: 0 !important; float: none !important; height: 100%; width: 100%; vertical-align: middle; display: inline-block; } #wds_container1_0 #wds_container2_0 #wds_slideshow_play_pause_0 { color: #000000; cursor: pointer; position: relative; z-index: 13; width: inherit; height: inherit; font-size: inherit; } #wds_container1_0 #wds_container2_0 #wds_slideshow_play_pause_0:hover { color: #000000; cursor: pointer; } #wds_container1_0 #wds_container2_0 .wds_left-ico_0, #wds_container1_0 #wds_container2_0 .wds_right-ico_0 { background-color: rgba(255, 255, 255, 0.00); border-radius: 20px; border: 0px none #FFFFFF; border-collapse: separate; color: #000000; left: 0; top: 0; -moz-box-sizing: content-box; box-sizing: content-box; cursor: pointer; line-height: 0; width: inherit; height: inherit; font-size: inherit; position: absolute; } #wds_container1_0 #wds_container2_0 .wds_left-ico_0 { left: -0px; } #wds_container1_0 #wds_container2_0 .wds_right-ico_0 { left: 0px; } #wds_container1_0 #wds_container2_0 #wds_slideshow_play_pause_0 { opacity: 1; filter: “Alpha(opacity=100)”; } #wds_container1_0 #wds_container2_0 .wds_left-ico_0:hover, #wds_container1_0 #wds_container2_0 .wds_right-ico_0:hover { color: #000000; cursor: pointer; } /* Filmstrip*/ #wds_container1_0 #wds_container2_0 .wds_slideshow_filmstrip_container_0 { background-color: #000000 !important; display: block; height: 0%; position: absolute; width: 100%; z-index: 10105; none: 0; overflow: hidden; } #wds_container1_0 #wds_container2_0 .wds_slideshow_filmstrip_0 { overflow: hidden; position: absolute; height: 100%; width: 0%; } #wds_container1_0 #wds_container2_0 .wds_slideshow_filmstrip_thumbnails_0 { height: 100%; left: 0px; margin: 0 auto; overflow: hidden; position: relative; width: 100%; } #wds_container1_0 #wds_container2_0 .wds_slideshow_filmstrip_thumbnail_0 { position: relative; background: none; float: left; height: 100%; padding: 0 0 0 0px; width: 0%; overflow: hidden; cursor: pointer; } #wds_container1_0 #wds_container2_0 .wds_slideshow_filmstrip_thumbnail_0 :active{ cursor: inherit; } #wds_container1_0 #wds_container2_0 #wds_filmstrip_thumbnail_0_0 { margin-left: 0; } #wds_container1_0 #wds_container2_0 .wds_slideshow_thumb_active_0 div { opacity: 1; filter: Alpha(opacity=100); border: 0px none #FFFFFF; } #wds_container1_0 #wds_container2_0 .wds_slideshow_thumb_deactive_0 { opacity: 0.50; filter: Alpha(opacity=50); } #wds_container1_0 #wds_container2_0 .wds_slideshow_filmstrip_thumbnail_img_0 { display: block; opacity: 1; filter: Alpha(opacity=100); padding: 0 !important; background-position: center center; background-repeat: no-repeat; background-size: cover; width: 100%; height: 100%; } #wds_container1_0 #wds_container2_0 .wds_slideshow_filmstrip_left_0, #wds_container1_0 #wds_container2_0 .wds_slideshow_filmstrip_right_0 { background-color: rgba(0, 0, 0, 0); cursor: pointer; display: table; vertical-align: middle; width: 20px; z-index: 10000; position: absolute; height: 100%; } #wds_container1_0 #wds_container2_0 .wds_slideshow_filmstrip_left_0 { left: 0; } #wds_container1_0 #wds_container2_0 .wds_slideshow_filmstrip_right_0 { right: 0; } #wds_container1_0 #wds_container2_0 .wds_slideshow_filmstrip_left_0 i, #wds_container1_0 #wds_container2_0 .wds_slideshow_filmstrip_right_0 i { color: #fff; display: table-cell; font-size: 30px; vertical-align: middle; opacity: 0; filter: Alpha(opacity=0); } #wds_container1_0 #wds_container2_0 .wds_none_selectable_0 { -webkit-touch-callout: none; -webkit-user-select: none; -khtml-user-select: none; -moz-user-select: none; -ms-user-select: none; user-select: none; } #wds_container1_0 #wds_container2_0 .wds_slide_container_0 { display: table-cell; margin: 0 auto; position: absolute; vertical-align: middle; width: 100%; height: 100%; overflow: hidden; cursor: inherit; cursor: inherit; cursor: inherit; } #wds_container1_0 #wds_container2_0 .wds_slide_container_0:active { cursor: inherit; cursor: inherit; cursor: inherit; } #wds_container1_0 #wds_container2_0 .wds_slide_bg_0 { margin: 0 auto; width: /*inherit*/100%; height: /*inherit*/100%; } #wds_container1_0 #wds_container2_0 .wds_slider_0 { height: /*inherit*/100%; width: /*inherit*/100%; } #wds_container1_0 #wds_container2_0 .wds_slideshow_image_spun_0 { width: /*inherit*/100%; height: /*inherit*/100%; display: table-cell; filter: Alpha(opacity=100); opacity: 1; position: absolute; vertical-align: middle; z-index: 2; } #wds_container1_0 #wds_container2_0 .wds_slideshow_image_second_spun_0 { width: /*inherit*/100%; height: /*inherit*/100%; display: table-cell; filter: Alpha(opacity=0); opacity: 0; position: absolute; vertical-align: middle; z-index: 1; } #wds_container1_0 #wds_container2_0 .wds_grid_0 { display: none; height: 100%; overflow: hidden; position: absolute; width: 100%; } #wds_container1_0 #wds_container2_0 .wds_gridlet_0 { opacity: 1; filter: Alpha(opacity=100); position: absolute; } /* Dots.*/ #wds_container1_0 #wds_container2_0 .wds_slideshow_dots_container_0 { opacity: 1; filter: “Alpha(opacity=100)”; } #wds_container1_0 #wds_container2_0 .wds_slideshow_dots_container_0 { display: block; overflow: hidden; position: absolute; width: 100%; bottom: 0; /*z-index: 17;*/ } #wds_container1_0 #wds_container2_0 .wds_slideshow_dots_thumbnails_0 { left: 0px; font-size: 0; margin: 0 auto; position: relative; z-index: 999; } #wds_container1_0 #wds_container2_0 .wds_slideshow_dots_0 { display: inline-block; position: relative; color: #FFFFFF; cursor: pointer; z-index: 17; } #wds_container1_0 #wds_container2_0 .wds_slideshow_dots_active_0 { color: #FFFFFF; opacity: 1; filter: Alpha(opacity=100); } #wds_container1_0 #wds_container2_0 .wds_slideshow_dots_deactive_0 { } /* Line timer.*/ #wds_container1_0 #wds_container2_0 .wds_line_timer_container_0 { display: block; position: absolute; overflow: hidden; top: 0; z-index: 16; width: 100%; height: 5px; } #wds_container1_0 #wds_container2_0 .wds_line_timer_0 { z-index: 17; width: 0; height: 5px; background: #E62D76; opacity: 0.50; filter: alpha(opacity=50); } #wds_container1_0 #wds_container2_0 .wds_slide_container_0 { height: /*inherit*/100%; } #wds_container1_0 #wds_container2_0 .wds_slideshow_image_spun1_0 { display: table; width: /*inherit*/100%; height: /*inherit*/100%; } #wds_container1_0 #wds_container2_0 .wds_slideshow_image_spun2_0 { display: table-cell; vertical-align: middle; text-align: center; overflow: hidden; height: /*inherit*/100%; } #wds_container1_0 #wds_container2_0 .wds_video_layer_frame_0 { max-height: 100%; max-width: 100%; width: 100%; height: 100%; } #wds_container1_0 #wds_container2_0 .wds_video_hide0 { width: 100%; height: 100%; position:absolute; } #wds_container1_0 #wds_container2_0 .wds_slider_car_image0 { overflow: hidden; } #wds_container1_0 .wds_loading_img { background-image: url(‘https://www.androidhive.info/wp-content/plugins/slider-wd/images/loading/0.gif’); } #wds_container1_0 #wds_container2_0 #wds_image_id_0_7 .wds_slideshow_image_0 { background-size: cover; background-position: center center; background-repeat: no-repeat; } #wds_container1_0 #wds_container2_0 #wds_image_id_0_7 .wds_slideshow_image_0 > video { background-size: cover; } #wds_container1_0 #wds_container2_0 #wds_image_id_0_12 .wds_slideshow_image_0 { background-size: cover; background-position: center center; background-repeat: no-repeat; } #wds_container1_0 #wds_container2_0 #wds_image_id_0_12 .wds_slideshow_image_0 > video { background-size: cover; } #wds_container1_0 #wds_container2_0 #wds_image_id_0_8 .wds_slideshow_image_0 { background-size: cover; background-position: center center; background-repeat: no-repeat; } #wds_container1_0 #wds_container2_0 #wds_image_id_0_8 .wds_slideshow_image_0 > video { background-size: cover; } #wds_container1_0 #wds_container2_0 #wds_image_id_0_9 .wds_slideshow_image_0 { background-size: cover; background-position: center center; background-repeat: no-repeat; } #wds_container1_0 #wds_container2_0 #wds_image_id_0_9 .wds_slideshow_image_0 > video { background-size: cover; } #wds_container1_0 #wds_container2_0 #wds_image_id_0_10 .wds_slideshow_image_0 { background-size: cover; background-position: center center; background-repeat: no-repeat; } #wds_container1_0 #wds_container2_0 #wds_image_id_0_10 .wds_slideshow_image_0 > video { background-size: cover; } #wds_container1_0 #wds_container2_0 #wds_image_id_0_11 .wds_slideshow_image_0 { background-size: cover; background-position: center center; background-repeat: no-repeat; } #wds_container1_0 #wds_container2_0 #wds_image_id_0_11 .wds_slideshow_image_0 > video { background-size: cover; }
2. Overview of PayTM Payment Lifecycle
Completing the checkout involves number of calls between app, backend and PayTM server. Below is lifecycle of a transaction from initiation to payment completion.
1. Preparing Order: Once customer selects the items, the cart items will be sent to backend server. This will insert a new order row or update existing row in db and generate unique Order ID. This order ID has to be unique each time user redirected to PayTM payment screen, otherwise PayTM throws duplicate order id error.
2. Order Id & Checksum: The next step is to generate checksum considering the order ID. The checksum has to be generated considering the mandatory fields and Merchant ID.
3. Redirecting to PayTM: Once the checksum is generated, user will be redirected to PayTM payment screen showing multiple payment options like Debit / Credit card, Wallet, Net Banking etc., In this step, if the generated checksum is wrong, user will redirected back to app with error status.
4. Bank Transaction: User completes the payment by choosing the options provided. Here PayTM takes care of communicating with bank and completing the payment.
5. Verifying transaction: Once the transaction is completed, it has to be verified on backend also to avoid fraudulent transactions. Here the backend server makes CURL request to PayTM server to verify the transaction status.
6. Order status: The transaction status is received from backend and appropriate order status is shown to user.
The below diagram illustrates the communication flow between each party. Here you can see the transaction lifecycle in detailed manner.
In real life scenario, building an e-commerce app needs proper architecture and taking security precautions. This article aims to explain the flow as simple as possible. So I have built what is necessary to complete the payment gateway integration. Integrating PayTM (or any other gateway) involves the below steps.
3.1. Registering with PayTM and obtain necessary API keys.
3.2 Building backend app with necessary database schema and REST API. Integrating the PayTM server SDK.
3.3 Integrating PayTM mobile SDK in android / iOS app.
To get started with PayTM, you can register a new account and get a test account to tryout the payment gateway. Follow the below steps to get your sandbox credentials.
1. Goto PayTM developer website and proceed with necessary steps to create a new account / login into existing account.
2. Once registered, navigate to API Keys in left navigation panel.
3. You can notice API details for Test and Production. Once the app is tested in sandbox, you can approach PayTM team to make your app live.
I have chosen Laravel (PHP) framework to build the backend module. In this, I have written necessary REST API required for this app. The admin panel is not built in this project.
This backend app / REST is already live and publicly available to tryout.
Base Url: https://demo.androidhive.info/paytm/public/api/
Postman dump: https://www.getpostman.com/collections/8b2e7763a8b7e0673918
Unlike my earlier tutorials, I am focusing only on important things in this article. The code of complete app can be found on Github page. Here, I am particularly interested in PayTMActivity.java as it has the core components of PayTM module.
The user will redirected to PayTM activity once the cart items are selected and clicked on Pay. This activity communicates with backend server multiple times to fulfil the order. I have written detailed comments under each method used.
Step 1: The list of cart items sent to server to create a new order. Here we call /prepareOrder endpoint to generate the unique order ID.
Step 2: Once the order ID is received, next we call /getChecksum by passing the Order ID along with other params to generate the checksum hash.
Step 3: Once the checksum is received, we call pgService.startPaymentTransaction() to redirect user to PayTM payment screen.
Step 4: Once the payment is completed, /transactionStatus is called to verify the transaction on server. Here we pass the same Order ID to verify the status.
Step 5: Once the transaction status is received, user will be shown success or failed screen by calling showOrderStatus() method.
package info.androidhive.paytmgateway.ui.paytm; import android.content.Intent; import android.os.Bundle; import android.support.v4.content.ContextCompat; import android.view.MenuItem; import android.view.View; import android.widget.ImageView; import android.widget.LinearLayout; import android.widget.TextView; import android.widget.Toast; import com.paytm.pgsdk.PaytmOrder; import com.paytm.pgsdk.PaytmPGService; import com.paytm.pgsdk.PaytmPaymentTransactionCallback; import com.wang.avi.AVLoadingIndicatorView; import java.util.ArrayList; import java.util.HashMap; import java.util.List; import java.util.Map; import butterknife.BindView; import butterknife.ButterKnife; import butterknife.OnClick; import info.androidhive.paytmgateway.BuildConfig; import info.androidhive.paytmgateway.R; import info.androidhive.paytmgateway.app.Constants; import info.androidhive.paytmgateway.db.AppDatabase; import info.androidhive.paytmgateway.db.model.CartItem; import info.androidhive.paytmgateway.db.model.User; import info.androidhive.paytmgateway.networking.model.AppConfig; import info.androidhive.paytmgateway.networking.model.ChecksumResponse; import info.androidhive.paytmgateway.networking.model.Order; import info.androidhive.paytmgateway.networking.model.OrderItem; import info.androidhive.paytmgateway.networking.model.PrepareOrderRequest; import info.androidhive.paytmgateway.networking.model.PrepareOrderResponse; import info.androidhive.paytmgateway.ui.base.BaseActivity; import info.androidhive.paytmgateway.ui.transactions.TransactionsActivity; import io.realm.Realm; import retrofit2.Call; import retrofit2.Callback; import retrofit2.Response; import timber.log.Timber; public class PayTMActivity extends BaseActivity { @BindView(R.id.lbl_status) TextView lblStatus; @BindView(R.id.loader) AVLoadingIndicatorView loader; @BindView(R.id.icon_status) ImageView iconStatus; @BindView(R.id.status_message) TextView statusMessage; @BindView(R.id.title_status) TextView responseTitle; @BindView(R.id.btn_check_orders) TextView btnCheckOrders; @BindView(R.id.layout_order_placed) LinearLayout layoutOrderPlaced; private Realm realm; private AppConfig appConfig; private User user; /** * Steps to process order: * 1. Make server call to prepare the order. Which will create a new order in the db * and returns the unique Order ID * <p> * 2. Once the order ID is received, send the PayTM params to server to calculate the * Checksum Hash * <p> * 3. Send the PayTM params along with checksum hash to PayTM gateway * <p> * 4. Once the payment is done, send the Order Id back to server to verify the * transaction status */ @Override protected void onCreate(Bundle savedInstanceState) { super.onCreate(savedInstanceState); setContentView(R.layout.activity_pay_tm); ButterKnife.bind(this); setToolbar(); enableToolbarUpNavigation(); getSupportActionBar().setTitle(getString(R.string.title_preparing_order)); changeStatusBarColor(); init(); } @Override public int getLayoutId() { return R.layout.activity_pay_tm; } private void init() { realm = Realm.getDefaultInstance(); realm.where(CartItem.class).findAllAsync() .addChangeListener(cartItems -> { }); user = AppDatabase.getUser(); appConfig = realm.where(AppConfig.class).findFirst(); prepareOrder(); } private void setStatus(int message) { lblStatus.setText(message); } /** * STEP 1: Sending all the cart items to server and receiving the * unique order id that needs to be sent to PayTM */ private void prepareOrder() { setStatus(R.string.msg_preparing_order); List<CartItem> cartItems = realm.where(CartItem.class).findAll(); PrepareOrderRequest request = new PrepareOrderRequest(); List<OrderItem> orderItems = new ArrayList<>(); for (CartItem cartItem : cartItems) { OrderItem orderItem = new OrderItem(); orderItem.productId = cartItem.product.id; orderItem.quantity = cartItem.quantity; orderItems.add(orderItem); } request.orderItems = orderItems; getApi().prepareOrder(request).enqueue(new Callback<PrepareOrderResponse>() { @Override public void onResponse(Call<PrepareOrderResponse> call, Response<PrepareOrderResponse> response) { if (!response.isSuccessful()) { handleUnknownError(); showOrderStatus(false); return; } getChecksum(response.body()); } @Override public void onFailure(Call<PrepareOrderResponse> call, Throwable t) { handleError(t); showOrderStatus(false); } }); } /** * STEP 2: * Sending the params to server to generate the Checksum * that needs to be sent to PayTM */ void getChecksum(PrepareOrderResponse response) { setStatus(R.string.msg_fetching_checksum); if (appConfig == null) { Timber.e("App config is null! Can't place the order. This usually shouldn't happen"); // navigating user to login screen launchLogin(PayTMActivity.this); finish(); return; } Map<String, String> paramMap = preparePayTmParams(response); Timber.d("PayTm Params: %s", paramMap); getApi().getCheckSum(paramMap).enqueue(new Callback<ChecksumResponse>() { @Override public void onResponse(Call<ChecksumResponse> call, Response<ChecksumResponse> response) { if (!response.isSuccessful()) { Timber.e("Network call failed"); handleUnknownError(); showOrderStatus(false); return; } Timber.d("Checksum Received: " + response.body().checksum); // Add the checksum to existing params list and send them to PayTM paramMap.put("CHECKSUMHASH", response.body().checksum); placeOrder(paramMap); } @Override public void onFailure(Call<ChecksumResponse> call, Throwable t) { handleError(t); showOrderStatus(false); } }); } public Map<String, String> preparePayTmParams(PrepareOrderResponse response) { Map<String, String> paramMap = new HashMap<String, String>(); paramMap.put("CALLBACK_URL", String.format(BuildConfig.PAYTM_CALLBACK_URL, response.orderGatewayId)); paramMap.put("CHANNEL_ID", appConfig.getChannel()); paramMap.put("CUST_ID", "CUSTOMER_" + user.id); paramMap.put("INDUSTRY_TYPE_ID", appConfig.getIndustryType()); paramMap.put("MID", appConfig.getMerchantId()); paramMap.put("WEBSITE", appConfig.getWebsite()); paramMap.put("ORDER_ID", response.orderGatewayId); paramMap.put("TXN_AMOUNT", response.amount); return paramMap; } /** * STEP 3: Redirecting to PayTM gateway with necessary params along with checksum * This will redirect to PayTM gateway and gives us the PayTM transaction response */ public void placeOrder(Map<String, String> params) { setStatus(R.string.msg_redirecting_to_paytm); // choosing between PayTM staging and production PaytmPGService pgService = BuildConfig.IS_PATM_STAGIN ? PaytmPGService.getStagingService() : PaytmPGService.getProductionService(); PaytmOrder Order = new PaytmOrder(params); pgService.initialize(Order, null); pgService.startPaymentTransaction(this, true, true, new PaytmPaymentTransactionCallback() { @Override public void someUIErrorOccurred(String inErrorMessage) { Timber.e("someUIErrorOccurred: %s", inErrorMessage); finish(); // Some UI Error Occurred in Payment Gateway Activity. // // This may be due to initialization of views in // Payment Gateway Activity or may be due to // // initialization of webview. // Error Message details // the error occurred. } @Override public void onTransactionResponse(Bundle inResponse) { Timber.d("PayTM Transaction Response: %s", inResponse.toString()); String orderId = inResponse.getString("ORDERID"); verifyTransactionStatus(orderId); } @Override public void networkNotAvailable() { // If network is not Timber.e("networkNotAvailable"); finish(); // available, then this // method gets called. } @Override public void clientAuthenticationFailed(String inErrorMessage) { Timber.e("clientAuthenticationFailed: %s", inErrorMessage); finish(); // This method gets called if client authentication // failed. // Failure may be due to following reasons // // 1. Server error or downtime. // 2. Server unable to // generate checksum or checksum response is not in // proper format. // 3. Server failed to authenticate // that client. That is value of payt_STATUS is 2. // // Error Message describes the reason for failure. } @Override public void onErrorLoadingWebPage(int iniErrorCode, String inErrorMessage, String inFailingUrl) { Timber.e("onErrorLoadingWebPage: %d | %s | %s", iniErrorCode, inErrorMessage, inFailingUrl); finish(); } @Override public void onBackPressedCancelTransaction() { Toast.makeText(PayTMActivity.this, "Back pressed. Transaction cancelled", Toast.LENGTH_LONG).show(); finish(); } @Override public void onTransactionCancel(String inErrorMessage, Bundle inResponse) { Timber.e("onTransactionCancel: %s | %s", inErrorMessage, inResponse); finish(); } }); } /** * STEP 4: Verifying the transaction status once PayTM transaction is over * This makes server(own) -> server(PayTM) call to verify the transaction status */ private void verifyTransactionStatus(String orderId) { setStatus(R.string.msg_verifying_status); getApi().checkTransactionStatus(orderId).enqueue(new Callback<Order>() { @Override public void onResponse(Call<Order> call, Response<Order> response) { if (!response.isSuccessful()) { Timber.e("Network call failed"); handleUnknownError(); showOrderStatus(false); return; } showOrderStatus(response.body().status.equalsIgnoreCase(Constants.ORDER_STATUS_COMPLETED)); } @Override public void onFailure(Call<Order> call, Throwable t) { handleError(t); showOrderStatus(false); } }); } /* * Displaying Order Status on UI. This toggles UI between success and failed cases * */ private void showOrderStatus(boolean isSuccess) { loader.setVisibility(View.GONE); lblStatus.setVisibility(View.GONE); if (isSuccess) { iconStatus.setImageResource(R.drawable.baseline_check_black_48); iconStatus.setColorFilter(ContextCompat.getColor(this, R.color.colorGreen)); responseTitle.setText(R.string.thank_you); statusMessage.setText(R.string.msg_order_placed_successfully); // as the order placed successfully, clear the cart AppDatabase.clearCart(); } else { iconStatus.setImageResource(R.drawable.baseline_close_black_48); iconStatus.setColorFilter(ContextCompat.getColor(this, R.color.btn_remove_item)); responseTitle.setText(R.string.order_failed); statusMessage.setText(R.string.msg_order_placed_failed); } layoutOrderPlaced.setVisibility(View.VISIBLE); } @OnClick(R.id.btn_check_orders) void onOrdersClick() { startActivity(new Intent(PayTMActivity.this, TransactionsActivity.class)); finish(); } @Override public boolean onOptionsItemSelected(MenuItem item) { if (item.getItemId() == android.R.id.home) { finish(); return true; } return super.onOptionsItemSelected(item); } @Override protected void onDestroy() { super.onDestroy(); if (realm != null) { realm.removeAllChangeListeners(); realm.close(); } } }
4. Testing the App
Once you have completed the PayTM integration, you can test your app (or the app provided in this article), using the test mode credentials provided.
Below are useful links you can keep handy while working on this project.
1. PayTM Android SDK documentation
2. PayTM REST API documentation
3. PayTM test mode credentials
I hope this article simplified the PayTM integration process. If you have any queries / suggestion, pls do post in the comment section below.
Happy Coding 🙂
Hi there! I am Founder at androidhive and programming enthusiast. My skills includes Android, iOS, PHP, Ruby on Rails and lot more. If you have any idea that you would want me to develop? Let’s talk: [email protected]
Woow!!! vry nice tutorial !!
great work.
Thank You Fenny 🙂
OMG MAN… Laravel & Android. This course is far far beyond Amazing. Absolutely Killed it, Litterly just need to do design pattern and dependency injection, and Boom. Real World App, For real. this is really far beyond of a tutorial. a great reference about how to mass with laravel and auth and how to get things into android with retrofit… got no word about what u did here. just amazing. :)))
Thanks Brave for your kind appreciation:)
All the best!
Hello Again. can u please add pagination to this tutorial?
Consider this, your customer getting almost 1000 product from retrofit, it’s not really smart to get all of them in same time. can u please add paginate in android app to make sure this won’t happen?
Hi Brave,
The main intent here is to show the basic concepts of e-commerce app. You can learn the concepts and apply in the same project.
i know what u say and i undrestand, but as u know things are quite different when u use something like laravel. if i use paginate how can i do pagination base on data i’m getting from server? i know things u’re talking about but handling pagination from server and bringing into android is another thing. i’m sure not gonna take u much time to do a tutorial base on this. just changing user->get; to get()->paginate(5); then show us how u handle the pagination from server in android.
This is insane Ravi very impressive work
Thank you Anele 🙂
I am glad this helped you in time:)
I had the checksum mismatch problem for few days, but later using the latest PHP SDK it worked.
Thank you so much Ravi
You are welcome 🙂
But By using this SDK we can’t get the amount available in Paytm user wallet bro
You can do it by calling check balance API
https://developer.paytm.com/docs/check-balance-api/
But you need to be registered as Merchant as per this forum
https://paywithpaytm.com/developer/discussion/topic/checking-balance-of-paytm-wallet/
Yeah bro…I already had account and integrated in two of my applications before
So you tried balance API already?
Yes bro
awesome as always
Thanks John 🙂
Good work Ravi Tamada….I learned a lot from androidhive Thank you so much for sharing your knowledge.
You are welcome Lynford:)
Hi ravi, I learned a lot from androidhive like push notification, paytm integration but in paytm integration i found error in /prepareOrder from android mobile Response{protocol=http/1.1, code=500, message=Internal Server Error, url=http://XXXXXXXXXX.in/PayTM/public/api/v1/prepareOrder}
why do we need to use the backend REST api?? And where did you call backend API, in which line, in android code??
In PayTMActivity every method makes REST API call using retrofit.
@Ravi Tamada:disqus how can i add line break (n) in arabic text inside resource file?
Line break works directly if you add n. Whats the problem?
BIG THANKS, Ravi!!!!!
I’m afraid PayTM allows only Indian phone numbers.
@@Ravi Tamada:disqus how to use sabre sop api in android .please give me any idea .
Seems your IP address is not allowed. May be it’s blocked and you are accessing it from other countries than INDIA.
I have developed an ecommerce android app but using the firebase as the database. So is the process same or will there be any changes… I can send you the code if you would like to see the working… I just want to add the payment gateway to it..
Hey Ravi,
I am getting error “Paytm checksum mismatch.”
Can you please tell me how to solve this error?
Are you using the latest PayTM php classes?
muito bom, incrível
! Obrigado.
I cant register my app its gives error : “message”: “Server Error”.
Plzz Help
Have restarted the services. Pls check now.
Where is backend sql file ?
The database tables will be created by running migrations. No plain sql file will be available.
how to solve the error of can not find the symbol glideapp
Hi sir, i am integrating Paytm but unable to redirect on paytm screen. please help i mm stuck
Any error report?
hi revi i am from indonesia please make tutorial payment gateway with integrasi midtrans
can this be tested on localhost
Yes. Use Laravel’s valet to start a tunnel from your localhost.
https://laravel.com/docs/5.8/valet
HI Ravi
I got the blank screen as soon pgService.initialize(Order, null); execute the line.
On back press, it ask me to cancel the transaction.
Any suggestion on this.
Regards,
Thanks sir, nice tutorial
Best Regards.
You are welcome 🙂
Hi Ravi,
Great Tutorial! But i am unble to register to continue testing the app.
Unknown Error Occured.Please Try again later.(During registering and login also)
Why is this error comming please help
I am not able to register and login please help sir
Hello Ravi,
I want to do the same app with sqlite database .Please help me.
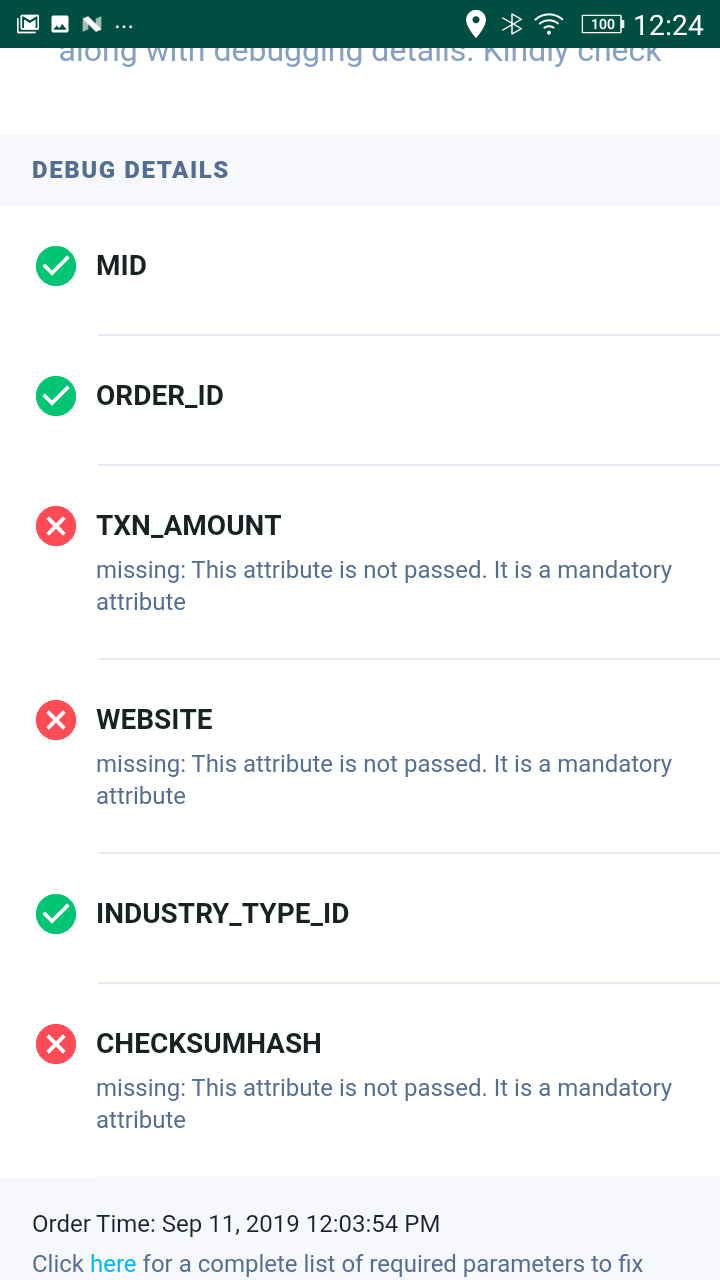
Hello Ravi im getting this Debug error .. I have tried with your tutorial… Please help me in this
Hi ravi… I am a great fan of your tutorials
Ravi can u help me out with MVVN .
pls build an complete example app using rxjava, mvvn and retrofit. because we can not find a way to integrate rxJava with mvvn.
we need a practical example of MVVN to understand .
Thanx for everything
Hi Deepak
I have planned this article very long back couldn’t complete it. May be I should upload a sample project.
Hi Ravi Please also share the backend database of admin panel
Hi Rajendra
It’s Laravel project. The database tables will be created by running migrations. You can see the model classes to understand the database schema.
Unknown Error Occured.Please Try again later.(During registering and login also)
Why is this error comming please help
I cant register my app its gives error : “message”: “Server Error”.
And how to implement it in production environment.
can anyone help me .. how can we live laravel and your baseURL is also not working sir
Hi Ravi. I don’t find checksum verification in above code. Is it not mandatory in Paytm Integration ?
It was done on backend via rest api call. Check here
https://github.com/ravi8x/Laravel-PayTM-Server/blob/master/app/Http/Controllers/API/OrderController.php#L156
Thank You 🙂
Hi Ravi, I have integrated Paytm in my android app. Everything is fine but payment page is shown for a second and goes off suddenly.
If I repeat this multiple times I got an error RuntimeException: Unable to start ComponentInfo.
and also shows a message PaytmSDK.getCallbackListener must not be null.
I have attached the error screenshot I captured.
Please let me know what the issue would be
Thank You in advance
Issue is very small. It says Network Error. But I have a doubt, My mobile has good wifi connection, Is this a different kind of network error ?
Hey there ,this article is amazing , sir can you mail that PaytmKit you used in this ,
it will so helpful for me , please mail me !!
Thank You !!
my mail id- [email protected]
AndroidHive
(function(d, s, id) {
var js, fjs = d.getElementsByTagName(s)[0];
if (d.getElementById(id)) return;
js = d.createElement(s); js.id = id;
js.src = “//connect.facebook.net/en_US/sdk.js#xfbml=1&version=v2.9”;
fjs.parentNode.insertBefore(js, fjs);
}(document, ‘script’, ‘facebook-jssdk’));
copyright © 2017 Droid5 Informatics Pvt Ltd
www.droid5.com