Do you want to add a blogroll on your WordPress site?
Blogroll is a list of links to other blogs that you own, or blogs that you admire, follow, or even compete with. The blogroll has a long history in the blogging culture.
In this article, we will share how to easily add blogroll in WordPress. We’ll also talk about the history of blogroll, and how you can benefit from it today.

What is a Blogroll?
A blogroll is a list of links to other blogs related to your own blog. It could include links to your other blog sites, or the blogs you like, or any websites you want users to checkout.
In its early days, blogging was more personal and community-driven. Like-minded folks often linked to other blogs that they enjoyed. Here is how we used to show a blogroll on WPBeginner back in 2009.
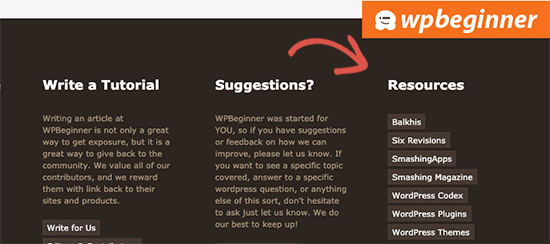
The blogroll was a common feature in those days which is why most blogging platforms supported it by default. However, as blogging became more mainstream and popular, the blogroll feature became less common.
WordPress had a blogroll feature from the very beginning. It was first called Links, then renamed to Blogroll in WordPress 2.1.
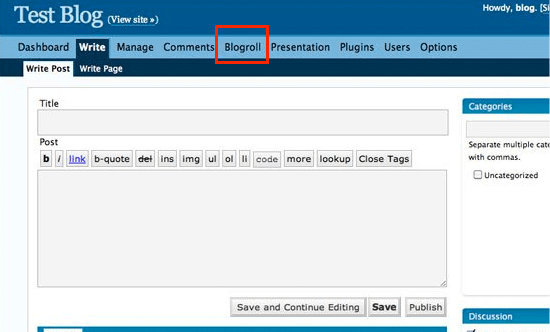
It was again changed to Links in WordPress 2.5 and remained that way until WordPress 3.5. At that time, the WordPress team decided to remove the feature from core.
The feature was still available as a free plugin called Link Manager. However that plugin hasn’t been updated in years, and you no longer need it to add a blogroll in WordPress.
Tip: If you are interested in how WordPress has changed over time, then do checkout our in-depth article on the history of WordPress.
Why Add a Blogroll in WordPress
Blogroll provides your users with the opportunity to visit other blogs that you recommend.
Normally, these are blogs or website that you or your company owns. However, you can also add links to other blogs that you admire or want your users to check out.
This allows your users to discover other blogs that you own or take a look at other sites that you recommend.
That being said, let’s take a look at how to easily add a blogroll in WordPress, manage links, and easily display it anywhere on your website.
Adding a Blogroll in WordPress
WordPress has an awesome menu management feature which was the reason the core team decided to remove the blogroll feature.
Normally, you would use navigation menus in WordPress to add links to your website’s navigation bar, footer links, or other places.
However, you can also use the same navigation menu to create and manage a blogroll in WordPress.
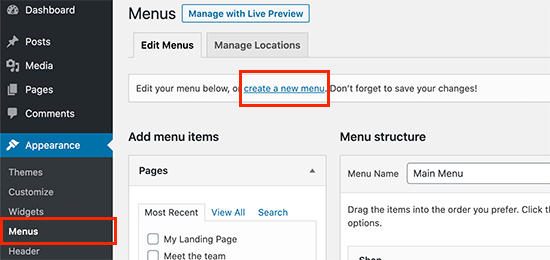
Simply go to Appearance » Menus page and click on the ‘Create a new menu’ link.
WordPress will now create a new blank menu for you and ask you to provide a name for it. You can name it Blogroll, so it is easy to identify when you are working on your website.
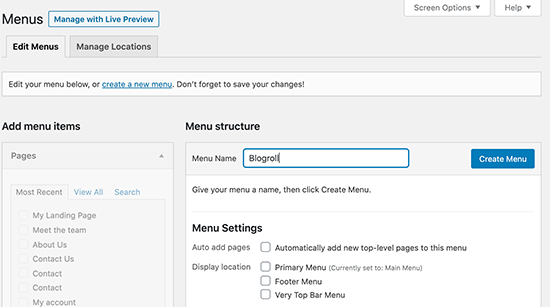
Don’t forget to click on the ‘Create menu’ button to save it.
After that, click to expand the ‘Custom Links’ tab under the ‘Add menu items’ column on the left.
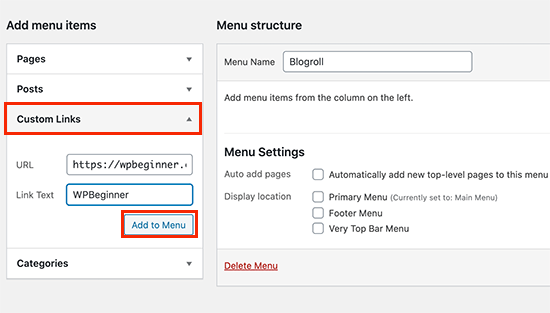
Here, you need to enter the URL of the blog or website, and then add the blog title under the ‘Link text’. After that click on the ‘Add to Menu’ button.
You’ll see an item appear under the right column and your blank Blogroll menu will now have an item in it.
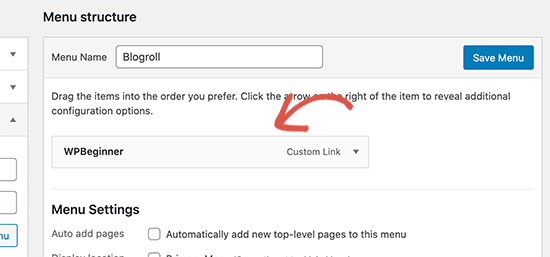
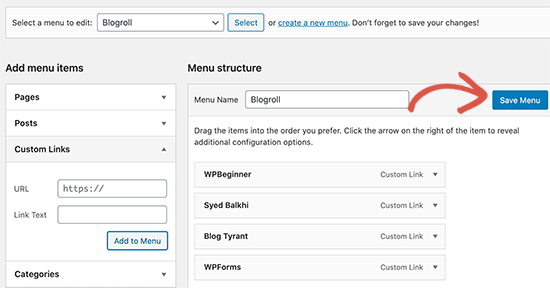
Now you can repeat the process to add other links that you want to display in your blogroll. After you are finished don’t forget to click on the ‘Save Menu’ button to store your blogroll links.
Open Blogroll Links in New Window and Make Them Nofollow
Blogroll links are external links which means they take away users from your website and pass along SEO link juice as well.
Now if you own all the links in your blogroll, and you don’t mind users leaving one of your blogs to view the other one, then you don’t need to add these.
However, if you don’t own those external links, then you may want to open them in a new window and make them nofollow.
These additional options are hidden by default, but you can easily unhide them.
Simply click on the ‘Screen Options’ button at the top right corner of the screen. It will display a flydown menu where you need to check the box next to ‘Link Target’ and ‘Link Relationship (XFN)’ options.
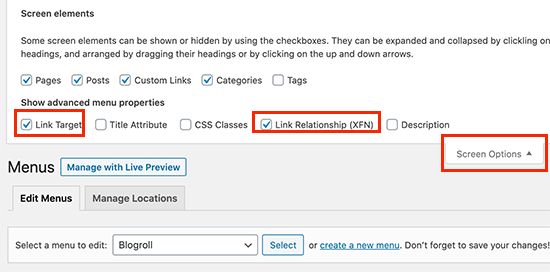
After that, scroll down to the links you added earlier and then click on any link to expand it. You can now check the box next to the ‘Open link in a new tab’ option and then enter ‘nofollow’ under the ‘Link Relationship (XFN)’ field.
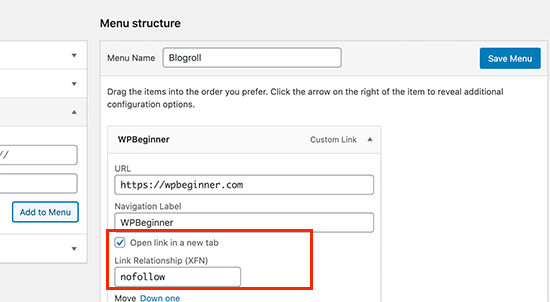
You can repeat the process for all the links that you want to nofollow or open in a new window. After that, don’t forget to click on the ‘Save Menu’ button to save your changes.
Displaying Blogroll on Your WordPress Site
Now that you have created the blogroll, you can go ahead and add it to your WordPress blog.
The most common place to display a blogroll is in your website’s sidebar.
Simply, go to the Appearance » Widgets page and add the ‘Navigation Menu’ widget to your sidebar.
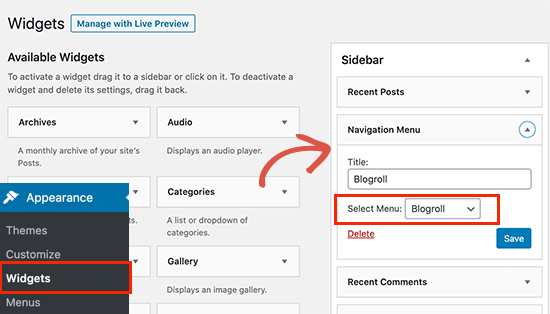
After that, enter the title you want to display for blogroll and then select the menu you created earlier from the drop-down menu.
Don’t forget to click on the Save button to store your widget settings.
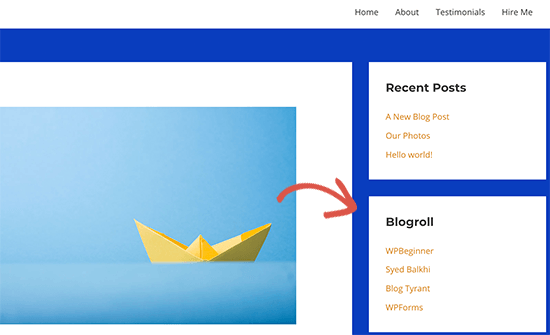
You can now visit your website to see your Blogroll displayed in sidebar. Here is how it looked on our test blog.
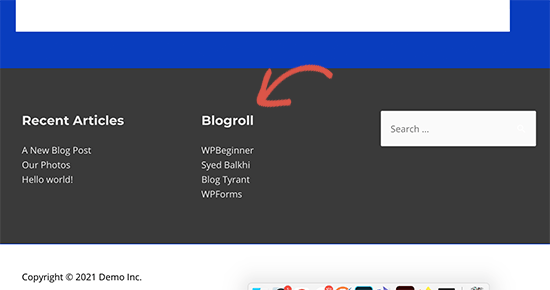
You can also show the blogroll in the footer area if your WordPress theme has a Footer widget area. You can check that by going to Appearance » Widgets page.
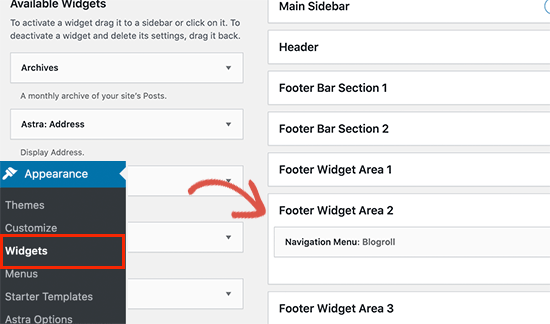
Simply add the Navigation Menu widget to the footer widget area and select the blogroll menu. Don’t forget to click on the Save button to store your changes.
You can now visit your website to see the blogroll links displayed in action.
We hope this article helped you learn how to easily add a blogroll in WordPress. You may also want to see our guide on how to create an email newsletter to connect with visitors after they leave your website, and our comparison of the best push notification software to grow your traffic.
If you liked this article, then please subscribe to our YouTube Channel for WordPress video tutorials. You can also find us on Twitter and Facebook.
The post How to Add a Blogroll in Your WordPress Site (without a Plugin) appeared first on WPBeginner.

