Do you want to learn how to lazy load images in WordPress?
Lazy loading allows your website to only load images when a user scrolls down to a specific image, which reduces website load time and improves website performance.
Most popular sites that are image heavy use lazy loading to boost website speed and performance.
In this article, we will show you how to easily lazy load images in WordPress, step by step.
Why Lazy Load Images in WordPress?
Lazy loading your WordPress images can speed up your website and offer a better user experience.
No one likes slow websites. In fact, a performance study found that a single second delay in page load time leads to 7% less conversions, 11% fewer page views, and 16% decrease in customer satisfaction.

Search engines like Google don’t like slow loading websites either. This is why faster sites rank higher in the search results.
Images take the most time to load on your website compared to other web elements. If you add a lot of images to your articles, then each image increases your page load time.
One way to handle this situation is to use a CDN service, like BunnyCDN. A CDN will let a user download images from a web server closest to them and reduce website loading speeds.
However, your images will still be loaded and affect the overall page load time. To overcome this issue, you can delay image loading by implementing lazy load on your website.
How does lazy loading for images work?
Instead of loading all your images at once, lazy loading downloads only the images visible on the user’s screen. It replaces all other images with a placeholder image or blank space.
As a user scrolls down, your website loads images that are visible in the browser’s viewing area.
Lazy loading can be very beneficial to your WordPress blog.
- It reduces the initial web page loading time, so users will see your site faster
- It conserves bandwidth by only delivering images that are viewed and can save on hosting costs
The release of WordPress 5.5 added lazy loading as a default feature.
However, if you want to customize how your images lazy load, and lazy load background images, then you’ll need to use a WordPress plugin.
Note: Although lazy loading will help to improve website loading speed, you should always optimize images for the web before uploading to WordPress for maximum performance.
For more details, see our guide on how to optimize images for web performance without losing quality.
We’re going to share two different WordPress plugins that can help you easily set up lazy loading for WordPress images. You can use the quick links below to jump straight to the method you want to use.
Method 1. Lazy Load Images in WordPress with WP Rocket
We recommend using the WP Rocket plugin to lazy load images in WordPress. It’s the best WordPress caching plugin in the market and lets you easily turn on image lazy loading.
Aside from that, it’s a very powerful plugin that helps you optimize your website speed without knowing complex technical terms.
Right out of the box, all of their default recommended caching settings will greatly speed up your WordPress website.
To enable image lazy loading, all you have to do is check a few boxes. You can even enable lazy loading for videos, which will improve your website speed even more.
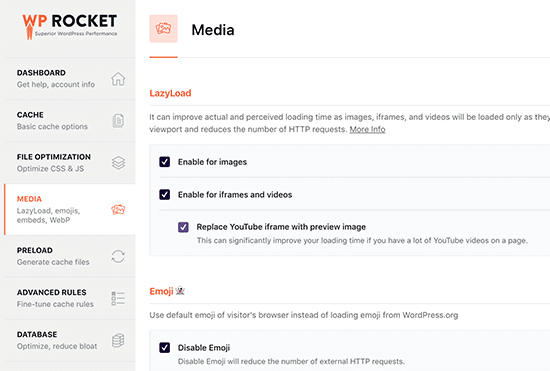
For more details, see our guide on how to properly install and setup WP Rocket in WordPress.
Note: if you’re using Siteground as your WordPress hosting provider, then you can use the free SiteGround Optimizer plugin that has similar lazy loading features.
Method 2. Lazy Load Images in WordPress with Optimole
This method uses the free Optimole plugin. It’s one of the best WordPress image compression plugins and lets you easily enable image lazy loading.
If you get over 5,000 visitors per month, then you’ll need the premium version.
First, you need to install and activate the plugin. For more details, see our step by step guide on how to install a WordPress plugin.
Upon activation, go to Media » Optimole and then you need to sign up for an API key.
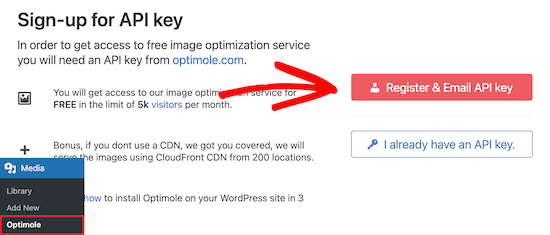
Simply click the ‘Register & Email API key’, and it will be emailed to you.
Then, enter your API key and click ‘Connect to Optimole Service’.
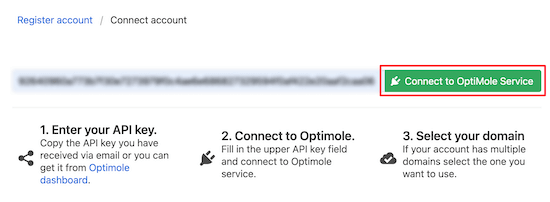
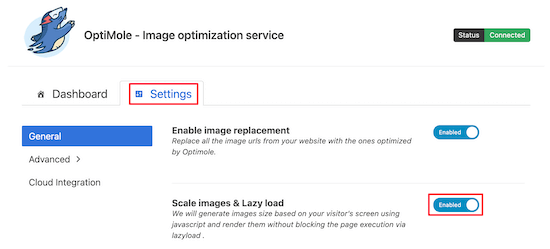
After that, click on the ‘Settings’ tab.
Here you can make sure the’ Scale images and & Lazy load’ setting is enabled. This will generate images based on your visitor’s screen size and improve loading speeds.
Next, click on the ‘Advanced’ menu option and select ‘Lazyload’.
On this screen, there are a few different settings that let you customize how your images will lazy load.
First, you can adjust the ‘Exclude first number of images from lazyload’ setting. This will stop images at the top of your posts or pages from lazy loading, so images above the fold will always appear.
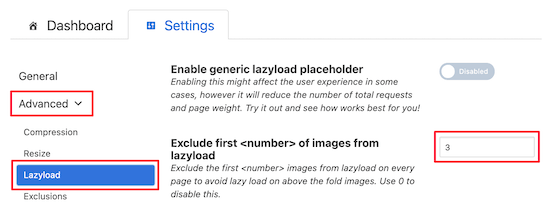
You can set this to 0 if you want every image to lazy load.
Next, you can enable the ‘Scale Images’ slider.

This will scale images to the visitor’s screen size and make your page load faster.
After that, you can turn on the ‘Enable lazyload for background images’ setting.

This will lazy load your background images, which can be some of the largest images on your website.
Another setting you can enable is lazy loading embedded videos and iframes. If you have a lot of embedded video content, then you’ll want to turn on this setting.

This will load a placeholder image in place of the video. When it’s clicked the full video will load.
You can continue to customize these settings and see what works best for your website and your images.
Before you exit the plugin settings, make sure to click the ‘Save changes’ button.
We hope this article helped you learn how to lazy load images in WordPress. You may also want to see our beginner’s guide to image SEO to optimize images for the search engines and our expert picks of the best email marketing services for small businesses.
If you liked this article, then please subscribe to our YouTube Channel for WordPress video tutorials. You can also find us on Twitter and Facebook.
The post How to Easily Lazy Load Images in WordPress (2 Ways) appeared first on WPBeginner.

