The Pillow package gives you the ability to extract EXIF (Exchangeable Image File Format) metadata from images. You can get a lot of information about your images via the EXIF data. However, there are some key data points that are more useful than others.
For those pieces of data, it’s nice to create a GUI so you can view it easily. For this tutorial, you will use PySimpleGUI.
Getting Started
Both Pillow and PySimpleGUI will need to be installed to be able to follow along with this tutorial. You can install them both using pip:
python -m pip install pillow PySimpleGUI
You may want to install these packages in a Python virtual environment. You can use virtualenv or Python’s built-in venv module.
Regardless of which way you end up going, you are now ready to write your GUI code!
Creating a Simple EXIF Viewer
The first step is to find an image that has EXIF data in it. You can use this one if you’d like:

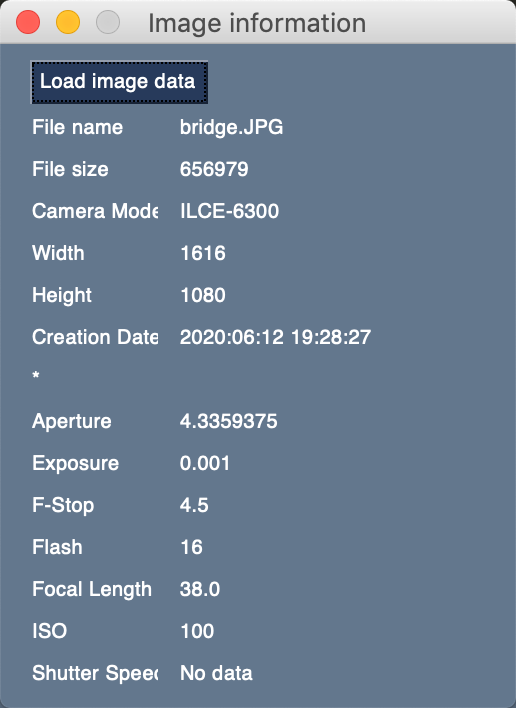
When you get done writing your code, your EXIF viewer will look like this:
To get started, create a new file named exif_viewer.py and add this code:
# exif_viewer.py

import PySimpleGUI as sg

from pathlib import Path
from PIL import Image
from PIL.ExifTags import TAGS

file_types = [("(JPEG (*.jpg)", "*.jpg"),
              ("All files (*.*)", "*.*")]

fields = {
    "File name": "File name",
    "File size": "File size",
    "Model": "Camera Model",
    "ExifImageWidth": "Width",
    "ExifImageHeight": "Height",
    "DateTime": "Creation Date",
    "static_line": "*",
    "MaxApertureValue": "Aperture",
    "ExposureTime": "Exposure",
    "FNumber": "F-Stop",
    "Flash": "Flash",
    "FocalLength": "Focal Length",
    "ISOSpeedRatings": "ISO",
    "ShutterSpeedValue": "Shutter Speed",
}


def get_exif_data(path):
    """
    Extracts the EXIF information from the provided photo
    """
    exif_data = {}
    try:
        image = Image.open(path)
        info = image._getexif()
    except OSError:
        info = {}

    if info is None:
        info = {}

    for tag, value in info.items():
        decoded = TAGS.get(tag, tag)
        exif_data[decoded] = value

    return exif_data


def main():
    elements = [
        [
            sg.FileBrowse(
                "Load image data", file_types=file_types, key="load",
                enable_events=True
            )
        ]
    ]
    for field in fields:
        elements += [
            [sg.Text(fields[field], size=(10, 1)),
             sg.Text("", size=(25, 1), key=field)]
        ]
    window = sg.Window("Image information", elements)

    while True:
        event, values = window.read()
        if event == "Exit" or event == sg.WIN_CLOSED:
            break
        if event == "load":
            image_path = Path(values["load"])
            exif_data = get_exif_data(image_path.absolute())
            for field in fields:
                if field == "File name":
                    window[field].update(image_path.name)
                elif field == "File size":
                    window[field].update(image_path.stat().st_size)
                else:
                    window[field].update(exif_data.get(field, "No data"))


if __name__ == "__main__":
    main()
That is a good-sized chunk of code! It would be confusing to try and explain all of it at once, so to make things easier you will go over the code piece by piece.
Here are the first few lines of code:
# exif_viewer.py

import PySimpleGUI as sg

from pathlib import Path
from PIL import Image
from PIL.ExifTags import TAGS

file_types = [("(JPEG (*.jpg)", "*.jpg"),
              ("All files (*.*)", "*.*")]

fields = {
    "File name": "File name",
    "File size": "File size",
    "Model": "Camera Model",
    "ExifImageWidth": "Width",
    "ExifImageHeight": "Height",
    "DateTime": "Creation Date",
    "static_line": "*",
    "MaxApertureValue": "Aperture",
    "ExposureTime": "Exposure",
    "FNumber": "F-Stop",
    "Flash": "Flash",
    "FocalLength": "Focal Length",
    "ISOSpeedRatings": "ISO",
    "ShutterSpeedValue": "Shutter Speed",
}
The first half of this code is the imports you will need to make your application function. Next, you create a file_types variable. This is used in a file dialog that you will create later on to allow the user to select an image to load.
Then you create a Python dictionary that holds all the EXIF fields that you want to display. This dictionary maps the EXIF name to a more readable name.
You are now ready to learn about the get_exif_data() function:
def get_exif_data(path):
    """
    Extracts the EXIF information from the provided photo
    """
    exif_data = {}
    try:
        image = Image.open(path)
        info = image._getexif()
    except OSError:
        info = {}

    if info is None:
        info = {}

    for tag, value in info.items():
        decoded = TAGS.get(tag, tag)
        exif_data[decoded] = value

    return exif_data
This function takes in the image path and attempts to extract the EXIF data from it. If it fails, it sets info to an empty dictionary. If _getexif() returns None, then you also set info to an empty dictionary. If info is populated, then you loop over it and decode the EXIF data and populate your exif_data dictionary before returning it.
You can move on to the main() function next:
def main():
    elements = [
        [
            sg.FileBrowse(
                "Load image data", file_types=file_types, key="load",
                enable_events=True
            )
        ]
    ]
    for field in fields:
        elements += [
            [sg.Text(fields[field], size=(10, 1)),
             sg.Text("", size=(25, 1), key=field)]
        ]
    window = sg.Window("Image information", elements)
Here you create all the Elements you need to create your user interface. You loop over the fields dictionary you defined at the beginning of your program and add a couple of text controls that will display the EXIF data you extract from your image.
PySimpleGUI makes this a snap since you can concatenate the new Elements to your elements list.
Once that’s all done, you add the elements to your Window.
The last piece of the puzzle is next:
    while True:
        event, values = window.read()
        if event == "Exit" or event == sg.WIN_CLOSED:
            break
        if event == "load":
            image_path = Path(values["load"])
            exif_data = get_exif_data(image_path.absolute())
            for field in fields:
                if field == "File name":
                    window[field].update(image_path.name)
                elif field == "File size":
                    window[field].update(image_path.stat().st_size)
                else:
                    window[field].update(exif_data.get(field, "No data"))


if __name__ == "__main__":
    main()
Here you have your event loop. When the user presses the “Load image data” button, the event is set to “load”. Here you load up the selected image path into Python’s pathlib. This allows you to extract the file name, absolute path, and file size using your Path object’s functions and attributes.
You use the dictionary’s get() method to get the field. If the field isn’t in the dictionary, then you display “No data” for that field.
If you’d like a small challenge, try adding a sg.Image() Element to this GUI so you can view the photo along with its metadata!
Wrapping Up
Now you know how to parse out the EXIF tags from an image. You also learned how to create a simple GUI using PySimpleGUI. The total number of lines for this GUI was only 84! You can create functional GUIs without needing to write hundreds of lines of code.
Pillow can do a lot more than only extract EXIF data. Check it out and see what else you can do!
Related Reading
- Getting GPS EXIF Data with Python
- Getting Photo Metadata (EXIF) Using Python
The post Create an EXIF Viewer with PySimpleGUI appeared first on Mouse Vs Python.