Gmail is a leading email service provider and is used by 1.5 billion-plus active users worldwide. All Gmail professional users receive at least dozens of emails daily. Thus, it becomes challenging for them to manage the bulk of data and information (invitations, proposal, portfolio, party, clients, group, etc.) properly.
Many times, they skip important business emails and deals, which further could turn into a great loss. Fortunately, the brains behind Gmail have found the solution to this problem as well. To manage and organize the mails, they created the ‘Gmail Folder’ feature.
Many professional Gmail users are also not being acquainted with this feature. But remember, if you don’t create folders, in that case, every time a new mail arrives in your Inbox, it gets more messy and disorganized. It takes your precious time to sort and clear such a cluttered mess.
Topics Covered:
What is a Folder?
Advantages of using folders in Gmail
Steps to create a Folder in Gmail on a computer
Steps to create a Nested label in Gmail
Steps to change a label in android
Steps to Move label using Move To option
What is a Folder?
“Folders are a very traditional method to sort and organize your data.”
In Gmail, Folders are also defined as labels. This is a very useful feature when you want to store any mail for a longer period but at the same time don’t want it to get highlighted at the top of your inbox. These mails are especially of part invitation or unofficial mails for friends and family or vocation places, etc. In Gmail, you can create, delete multiple folders. It also allows the user to add or remove any mail easily from your folder/label. Removing a mail from your label doesn’t delete it from your Gmail; it is again positioned to the exact same place from where you initially move to your folder.
Advantages of using folders in Gmail
- Sorting: One can easily create and manage Gmail folders with the help of labels. Folders are one of the easiest approaches to sort your daily mails as per their significance and information.
- Different categories: You can create as many folders or labels as you want with different categories. It essentially serves the purpose of grouping your emails, resulting in proper alignment of your inbox.
- Move to Feature: The Gmail “Move to” feature allows the user to effortlessly send the emails to their particular folder. It also moves the replied email — or the thread of emails — from your inbox to the folder that you have created.
Steps to create a Folder in Gmail on a computer
Below are the step-by-step demonstrations to create a folder in Gmail on a computer:
STEP 1: Login to your Email address
- Open the Google Gmail application on your web browser, or you can directly visit the URL: https://mail.google.com/. Login into your account by using your email address and password.
- You will arrive in your Gmail Inbox window.

STEP 2: Select your particular email
- Point your cursor on the email which you want to add to your folder. To create a label, the user must select the particular email’s checkbox first. But once you have created, you can always eliminate the email from the label—Right-click on the selected mail.

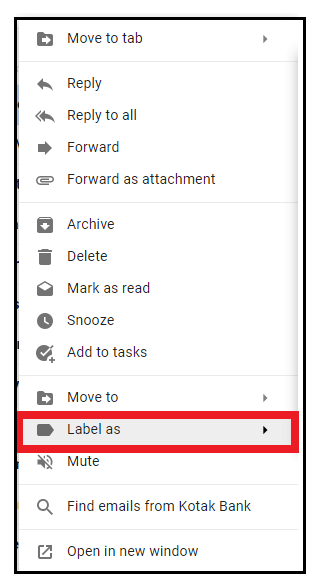
- A dialog box will be prompted. Click on the ‘Label as’ option.
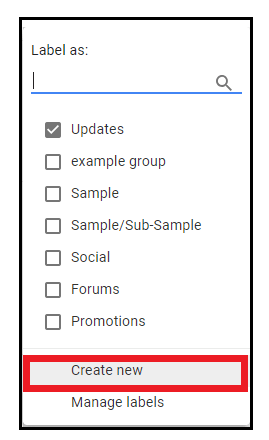
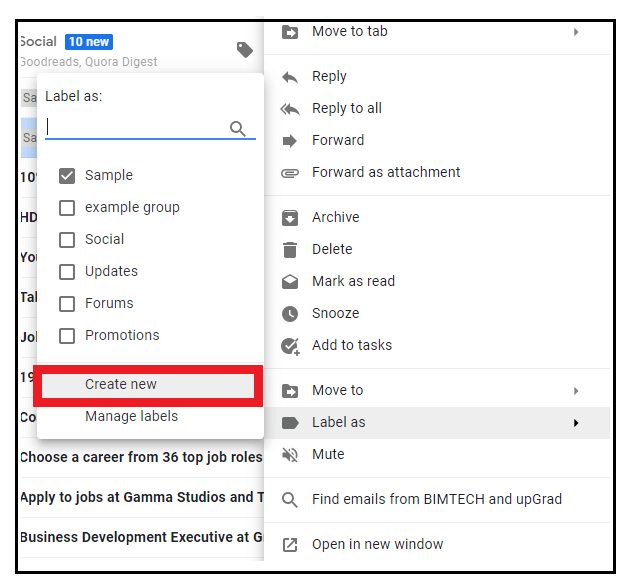
- Again, a new dialog window will be displayed. Click on the ‘Create new’ option placed at the bottom of the window.
STEP 3: Create your label
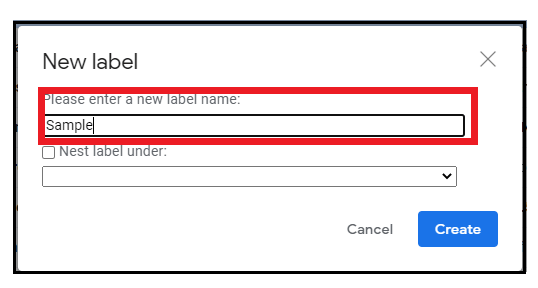
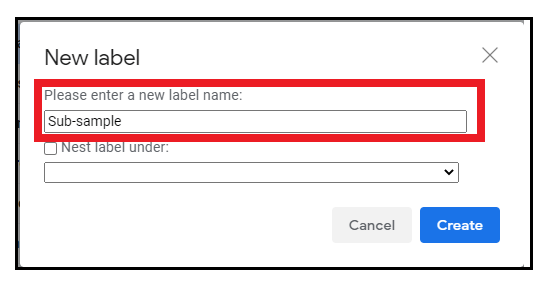
- The ‘New Label’ window will be prompted. Type in the name for your label/folder in the specified textfield. As in the below image, I have named my label ‘Sample.’
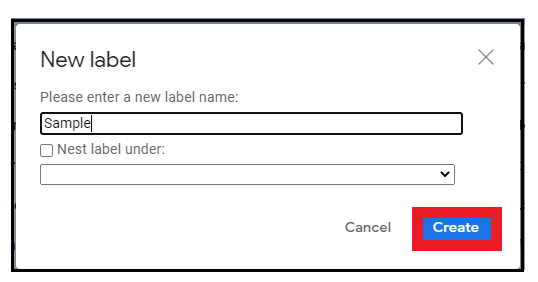
- Click on the ‘Create’ button. Gmail will add the conversation to your label/Folder.
STEP 4: Add emails to your folder
- As we have created our label now, the last step is to add our folder’s emails. Select the mail by clicking on the check box present to the left of an email.
- The window will be prompted. Scroll down and select the “Label as” option from the list.
- From the resulting window, select the label name to which to want to add your conversation. Click on apply.
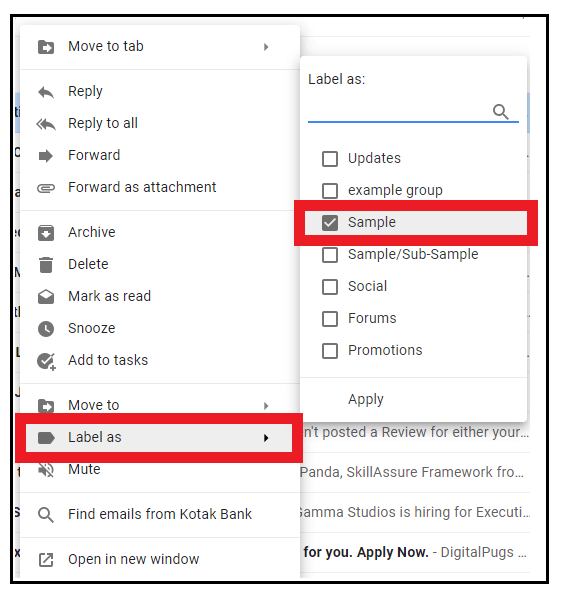
Note: If you have multiple labels, you can type in your label’s initials, and Gmail will automatically suggest it for you. Thus, making it easier for the user to search for the label name.
STEP 5: Fetch your Folder/label
- On the left side of your Gmail window below the Drafts, you will find all the Labels that you have created so far.
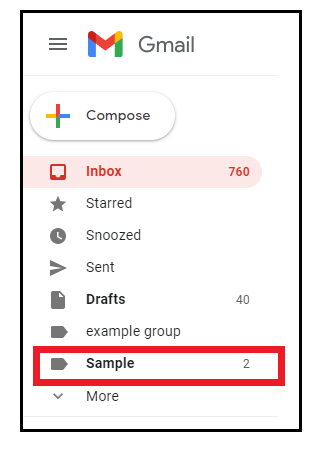
- Click on the label that you wish to open. Here As I have created a sample, so I will open it. In the following image, you can see the threads of mail stored in our folder.

Steps to create a Nested label in Gmail
A nested label is defined as a label inside a label. This Gmail feature allows the user to create sublabels inside the parent folder/label. Nested labels organize your emails to a greater extent and make it look even more specific and structured.
Below are the step-by-step demonstrations to create a nested label in Gmail on a computer:
STEP 1: Select the mail
- Select the mail by clicking on the check box present to the left of an email.

STEP 2: Create your label
- The window will be prompted. Scroll down and select the “Label as” option from the list. From the resulting window, select the create label option.
- A window will be prompted. Type in the new nested label name in the respective text field.
STEP 3: Check on the Nested label option.
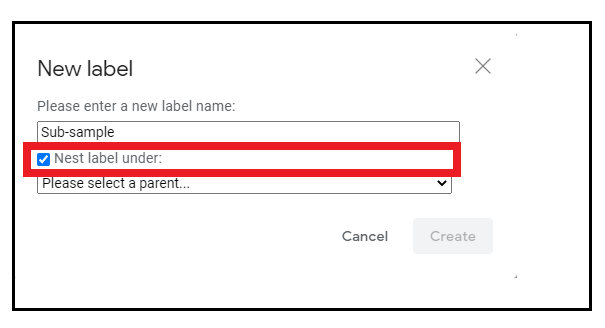
- Below the field option, you will find the ‘Nest label under’ feature, and on the left to it, there is a check box. Click and tick on the check box. This will enable nested label options.
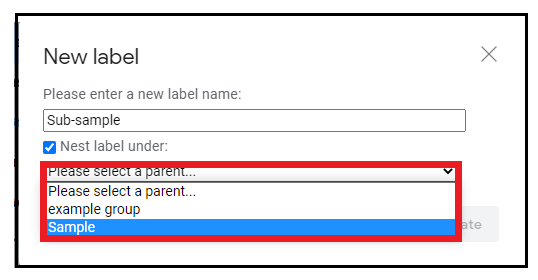
STEP 4: Select Your Parent Label
- Next, there is a drop-down that displays your entire existing label name. Choose your parent label under which you wish to create the nested lab.
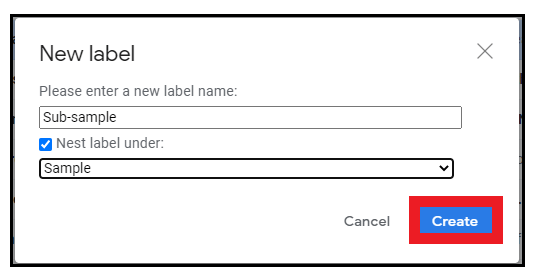
- Click on create. This is to create the nested label inside your parent label and will add your conversation to that folder.
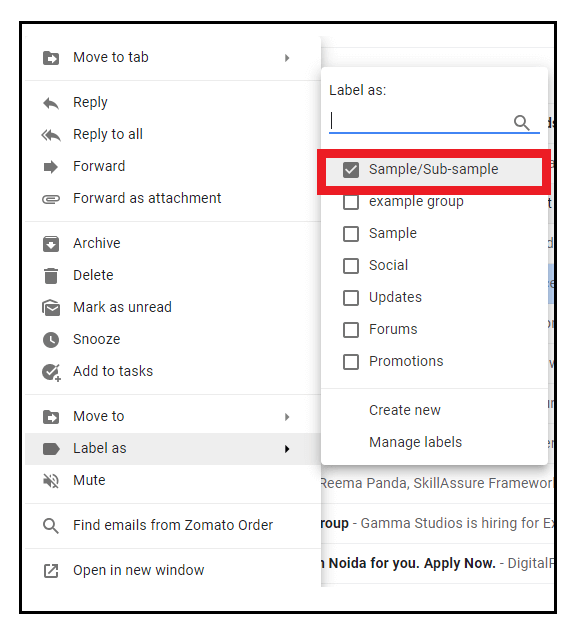
STEP 5: Add email to your nested label
- Select the mail, right-click on it. Click on Label as-> Sub-Sample (your nested label).
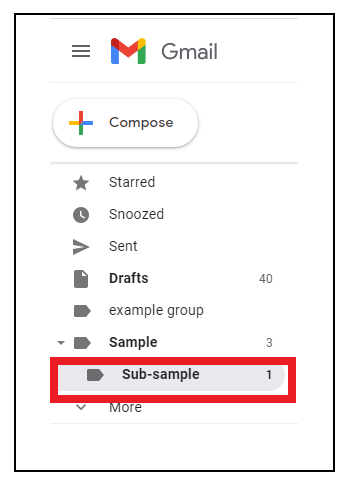
- Your email will be moved to your nested label. To confirm its disposal, look for the labels placed at the left corner of the page. You can see the label and sub-label, as shown in the below image.
Steps to change or move a label in Android
Although the Gmail app allows the user to create a folder or label, it has extended its credibility to add, delete, or replace any email from the pre-defined label.
Below are the step-by-step demonstrations to change a label on an android smartphone:
STEP 1: Download the Gmail app for android
- Unlock your android phone and download the Gmail app from your Android Play store. The icon would have a round red circle with the colorful outlined silhouette of M inside, as shown in the image below.
- Open the app and login to it by typing your email address and login password.
STEP 2: Select your email
- Tab on the email that you would like to add to your Label. You will notice that a check box will be created in front of your email. Select the check box.
- Go to the three verticals dots located in the top-right position of your screen.
Step 3: Click on Change Label
- A small window with various features will be displayed. Click on the ‘Change Labels’ option.
- From the listed options, select your label name. Click on the OK button to confirm the Label.
STEP 4: Select Inbox as well as Label
- Gmail also provides the facility to store the email under your Inbox and in any specified folder. To keep your mail in the Inbox and Sample, the user only needs to select both the label name from the dropbox window (refer to the below image).
Steps to Move label using Move To option
Below are the step-by-step demonstrations to move a folder in the Gmail app:
- Download the Gmail mobile app. Open the app and log in to your Gmail account.
- Tab on the email which you wish to move to another label.
- Tick on the checkbox placed at the front of the email.
- Click on the three vertical dots located on the top-right position of your Gmail app window.
- The drop-box window will be displayed. Select the ‘Move to’ feature.
- Choose the label name from the given options.
That’s it. Your email will be moved to the selected label.


